Yesterday I put the final touches on the Tudor men's outfit - hose, doublet, codpiece - even a hat. James (the model) won't be donning it until the photo shoot in October, but here are a few pictures of it in the studio:
The alert viewer will have noticed, perhaps, that the hat brim uses up scraps of material left over from the sleeves. I had only a very small piece of that fabric, a weird kind of velvet, to begin with, but managed to get the sleeves out by not paying attention to the nap (and getting away with that). From the scraps left over I pieced the brim, stitching in some very basic "goldwork" to make it work.
Wednesday, 26 August 2015
Saturday, 22 August 2015
Bustle Cages and Petticoats
Last week we made bustle cages (2 days) and petticoats (3 days). They complete the undergarments - a set of four including the corset and 'onesie' - a 19th-century lady would have worn under what promises to be a voluminous gown.
Bustle cages are made on a simple principle: a small piece of fabric sewn to a bigger piece of fabric, which is then held 'poofed out' by means of some sort of rigid bands inserted into channels sewn onto it. For the rigid bands we snapped the right size pieces from a roll of coiled steel, then filed the ends and wrapped tape around them:
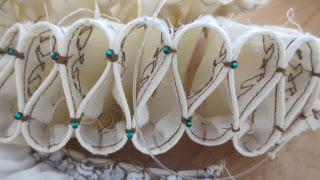
Putting the bands inside the channels: only the top two crossed channels at the top (picture below) were tricky - insert into side seam opening, then try and hold that curved fabric under the machine while not allowing the steel to get to the needle... but it worked! the other channels have a gap in the middle for insertion (next picture). One lesson learned: make sure the tape used for the channels is woven tightly enough that it can resist the pressure of the steel.
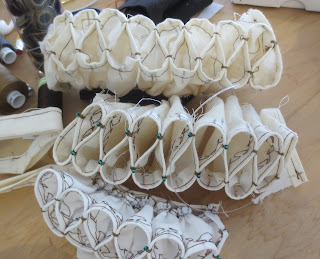
Unfinished, they look like so many cat tunnels!
Finished - they do what they have to do, namely accentuate the posterior. It's a question whether Rosie would have approved...
After bustle cages, petticoats were relatively straightforward: a skirt in four pieces, flat in front and mega-gathered and ruffled in back. What took longer was making, finishing, and installing those 14 yards of ruffle!
Sunday, 16 August 2015
Victorian Corsets
And I thought Tudor male fashion was an architectural marvel!
Last week we spent three days making an actual Victorian corset - this in a valiant attempt to get 21st-century figures into a 19th-century hour-glass shape. As a society we have simply gotten larger, all of us - even the thinnest women of today no longer have the shapes which the corset imposed on our counterparts in the 1870s and 1880s.
We started with a "photocopy-enlarged-to-basic-size" pattern, which we then altered to fit our various bodies (in corsets, accuracy is important - hence the carbon paper pad for marking seams):
Next we made it up from two layers treated as one, a skin-side layer of soft lightweight cotton, an outside layer of a fabric called coutil: "Although coutil is more expensive, it is better for corsetry because of its weave. Coutil has a special herringbone weave that makes it very strong. It doesn’t shrink or stretch nearly as much as denim or canvas, so it provides a sturdy, non-stretch base for long-use corsets" (this from Dramatic Threads - post on corsets).
For the course, coutil comes on a big roll - ah, the luxury of rolls of fabric!:
Corsets are laced in the back, of course. The line of grommets for the lacing goes between two metal plates, so the markings and the grommet placement have to be pretty exact.
Punching the holes is always a little unnerving...
But putting in the grommets with our industrial grommeter is always fun (note to self - don't put thumb under the pin...):
Inside the corset, steel as a modern substitute for whalebone. From left to right: front hook plates, straight plates for the back, front eye plates (with the gold), coil rods. Many of these had to be sized to fit, which means cutting with metal snips, filing with metal files, manipulating ends with pliers.
Getting ready to sew the channels for the metal (my corset: 20 pieces):
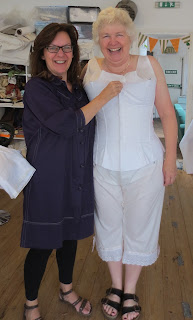
Once we had sewn up the - 10 - panels, Pauline helped us try it on for fit (over our Victorian 'onesies'), with just the plate rods at the centre back. I did have to make mine smaller!
Final steps include putting in extra channels for more rods, adding top trim (I opted for some racy red-and-black striped silk with a bit of black chiffon and lace...), adding a bottom bias binding, stitching as close to all that metal as possible to hold it in place. The poor machine has to go through some 10 or so layers at certain points, all with the zipper foot so that the needle can edge to the steel. Tricky sewing! And then the reward: the final fit:
About that final fit: corsets don't subtract, they redistribute. What you have has to go somewhere, so it goes - obviously - from the waist either upwards or downwards. Are they at all comfortable? well - they're not as uncomfortable as I had thought they'd be. No belly breathing, mind you. And picking things up from the floor - well, best to have servants, I guess.
Sunday, 9 August 2015
Trim and the Virtue of Repetition
This will be a short post - extolling the virtue of repetition. As a home sewer I would acquire a skill - I think the right word would be "briefly": just for the project which should have been done yesterday, then left languishing to be relearned the next time it was required, possibly several years down the road.
In the course - none of that! it's a serious "go big or go home" sewing situation. You don't just learn to add trim, you add trim to 18 trunk-hose panes on both sides, for a total of some 18 meters:
You don't just make piping, you make 10 meters while you're at it, AND apply it to tricky collar corners in an act of reckless bravery:
And note the gold (of which around 4 yards are sewn on the doublet): the remaining yard I took apart - gimp unravels surprisingly easily - to give me the 188" of gold cord I sewed on to the edge of my ruff... (by machine, by machine!)
I'm learning. I'm learning A LOT. And part of the learning is the luxury of serious repetition.
'Ruffs 'n Cuffs'
One indispensable piece of the male Tudor outfit: 'ruffs 'n cuffs.' Women wore them too, mind you, but they definitely feature in paintings of the period when it comes to men's wear. These 'ruffs 'n cuffs' were not trivial constructions - not just a bit of gathered lace, say, or some arbitrary white fabric peeking out around the neck or the wrists. No - they were carefully and artfully constructed out of starched white linen, often with decoration, sometimes even with metal frames to hold them up.
Laundering them - because it was a mark of wealth to wear such white things - meant deconstructing, washing and starching, and then reconstructing - every time. Even a skilled 'ruffs 'n cuffs' person would have had a good day's work in the doing of it.
You always start with - samples. You try this, you try that, you try a third and a fourth and a fifth sample, until you finally settle on what (to you) looks best for your outfit. Making a sample also involves measurement - how many flat inches go into one pleated/gathered inch, and how many of the finished inches do you need?
Here are a few of the class's samples, demonstrating the two main techniques, box-pleating + gathering, or cartridge pleating (a whole 'nother world).
First: box-pleating + gathers result in honey-combs, particularly when you do a double row (pleats on two sides, gathers down the middle):
You can change the shape a bit by changing the pleating a bit, for example roses or swirls instead of honey-combs:
Cartridge pleating results in figure-8s, a shape enhanced when you sew fishing line into the edge as the one sample shows:
The pleats need to be exact - in the sample below, the figure-8s didn't work because the other end hadn't been kept exactly straight:
Decoration is the fun part - since each single pleat needs to be stitched another single pleat, there's real temptation to make that stitching part of the decoration. That can mean something like 280 beads per ruff (estimate for the second sample below), if you decide on beads:
A lot of yardage goes into them - very normal is a ratio of 20 flat inches to 1 gathered inch. My design choice was relatively conservative: around 94" flat for a 17" neck ruff, around 135" flat for an 11" cuff. Yes - more inches for the smaller length, but that's likely because my neck ruff is made doubled and so more easily looks fuller. Here's my sample pinned on to the doublet:
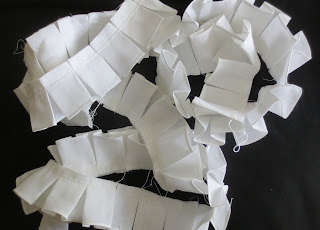
Here's what my 'ruff 'n cuffs' look like flat, waiting for the pleats to be sewn and then the whole thing gathered (my weekend task):
Subscribe to:
Posts (Atom)


